How to follow along
Two basic docker commands are required to follow along with this lesson -
docker pull learnreverseengineering/lesson2docker run -it --cap-add=SYS_PTRACE --security-opt seccomp=unconfined learnreverseengineering/lesson2 bash
Start the lesson by running cat /lesson/movInstruction.c to print the first code sample that we're going to reverse engineer.
This resource will be immensely useful during this lesson and subsequent ones. It teaches the most important GDB / PwnDBG commands to make you a reverse engineering deity.
The MOV instruction
MOV is one of the most fundamentally important instructions in any assembly language, in my
opinion. It enables an application to MOVe a piece of data (a constant, an address, a bitmask,
anything) from one location to another. The instruction looks as follows: MOV destination, source
Generally speaking, the source can be either a CPU register or a location on the stack (an
additional area of data storage which we're going to tackle in the next lesson). If the source is a
register then the destination can either be a register or a location on the stack, however if the
source is a location on the stack then the destination must be a register (stack to
stack MOVs are not permitted.)
An example - the C code
Consider the simple code in movInstruction.c -
        #include <stdio.h>

        int main(int argc, char** argv){
            int variableOne = 0x35;
            int variableTwo = 0x2a;
            int variableThree = 0x0;
            // Putting one variable into another
            variableThree = variableOne;
            printf("Number is: %d\n",variableOne);
            printf("Number is: %d\n",variableTwo);
            printf("Number is: %d\n",variableThree);
            exit(0);
        }
Themain function, which declares some integer variables, assigns them some hexadecimal values (53,
42 and 0 respectively) and then prints them with printf.
Without even disassembling the app at /lesson/movInstruction we can already see where the MOV
instructions probably are, every instance of something = somethingElse will
generally create a MOV instruction in the resulting ASM.
An example - the corresponding ASM code
I initially thought about just showing the disassembly for the above C application, but it contained so much use of the stack (which is covered next lesson!) that it felt more appropriate to just manually write a pure (fully functional) assembly application here instead which performs the same operations, without relying so heavily on the stack.
As such, the code snippet below (found in /lesson/movInstruction.asm) is the simplest accurate representation of the original C source code.
    section .data
        msg: db "Number is:%d", 13, 10, 0 ; equivalent to "Number is:%d\r\n\0"

    section .text
        extern printf
        extern exit
        global _start, main

        main:
        _start:
            mov RDI, msg  ; put the "Number is:%d" message to print into RDI
            mov RSI, 0x35  ; put 0x35 into RSI
            call printf; x64 calling convention is that the first argument to the function is inside of RDI, then RSI

            mov RDI, msg  ; again, message into RDI
            mov RSI, 0x2A ; put 0x2A into RSI ready to print it
            call printf ; call printNumber, which will print 0x2a

            mov RAX, 0x0 ; put zero into RAX (variableThree)
            mov RBX, 0x35 ; put 0x35 into RBX
            mov RAX, RBX ; overwrite RAX with RBX (0x35), this is equivalent to variableThree = variableOne eh?
            mov RSI, RAX ; put the 0x35 into RSI ready to print it
            mov RDI, msg ; same again, message into RDI
            call printf

            mov RDI, 0 ; exit code will be '0'
            call exit ; quit the app
The assembly above was prebuilt inside of the lesson's Docker container, it can be found in /lesson/movInstructionAsm. If you'd like to manually build the assembly code as a learning exercise (which I greatly encourage) then run nasm -felf64 -o temp -l temp.lst movInstruction.asm followed by ld temp -o myAssembly -lc --dynamic-linker /lib64/ld-linux-x86-64.so.2 these two steps compile and link the assembly app into an executable called "myAssembly"
Let's work through this code line by line to help make the material stick!
| Assembly code | Description |
|---|---|
section .data |
Define the 'data' section of the executable |
msg: db "Number is:%d", … |
Create a string constant called message, the '13,10,0' part is just the decimal representation of \r\n\0 (carriage return, line feed, null character) |
section .text |
Define the 'text' section of the executable |
extern printf |
Indicate that the printf function should be linked from glibc |
extern exit |
Indicate that the exit function should be linked from glibc |
global _start, main |
Define our functions, start and main are the same but NASM needs _start to be defined |
main: |
Start the main function |
_start: |
And the _start function |
mov RDI, msg |
Put the address of our "Number is:".. String constant into the RDI register, this is the first argument to printf |
mov RSI, 0x35 |
Put 0x35 into RSI, this is now our 'variableOne' variable, this is the second argument to printf |
call printf |
This is how we call functions in assembly, with the CALL instruction. Call the printf
function with RDI and RSI as arguments, directly equivalent to printf("Number is: %d\r\n", 0x35);
|
mov RDI, msg |
The RDI register is overwritten by the call to printf above, so reset to to the correct value again |
mov RSI, 0x2A |
Put variableTwo (0x2A) into RSI, which is the second argument to printf |
call printf |
call printf again |
mov RAX, 0x0 |
Imagine that the RAX register is our variableThree, put 0 into it |
mov RBX, 0x35 |
Put 0x35 into RBX |
mov RAX, RBX |
Put RBX into RAX (variableThree, right?) |
mov RSI, RAX |
Put RAX into RSI, the second argument to printf |
mov RDI, msg |
Put the message into RDI again, the first argument to printf |
call printf |
Call printf |
mov RDI, 0 |
Put 0, the exit code, into RDI. |
call exit |
Call exit with RDI as an argument |
The CALL instruction
You were just inadvertently introduced to the CALL instruction in the previous code snippet. This
instruction is the way that x64 (and x86) ASM applications make function calls like
printf(), exit(), fgets(), socket() etc.
When we call functions in high level languages like C, we simply pass the arguments in parenthesis when we call
the function (printf("something: %s", somethingElse); for example). In assembly we use different
'calling conventions' to dictate how functions are called.
I won't go into too many details here as there are... quite a lot... of calling conventions, but thankfully on Linux when writing x64 ASM you only need to worry about one, which is defined excellently https://www.ired.team/miscellaneous-reversing-forensics/windows-kernel-internals/linux-x64-calling-convention-stack-frame
Generally speaking, what you need to care about as a reverse engineer is that arguments to functions work as follows -
- The first argument to any function goes into the RDI register
- The second argument in RSI
- Third argument in RDX
- Then RCX
- Then R8
- Then R9
- Subsequent arguments are pushed onto the stack (discussed soon..)
Obviously this is straightforward enough, but an example is always welcome! Consider the following C code -
    void exampleFunction(int arg1, int arg2, int arg3, int arg4, int arg5, int arg6, int arg7){
        // do something cool with arg1-arg7
    }

    void main(int argc, char** argv){
        exampleFunction(1, 2, 3, 4, 5, 6, 7);
    }
The above C code translates to the following ASM snippet (truncated for brevity) -
    main:                    ; start of main function
        mov RDI, 1
        mov RSI, 2
        mov RDX, 3
        mov RCX, 4
        mov R8,  5
        mov R9,  6
        push     7            ; as mentioned above, beyond 6 args we start pushing args to the stack
        call exampleFunction

    exampleFunction:          ; start of exampleFunction function
        ............          ; do something cool with arg1-arg7
Debugging the ASM in GDB
To really cement how this stuff works and to wrap this lesson up, we're going to step through the above assembly
code line by line in the GDB disassembler! From the lesson's Docker container run gdb
movInstructionAsm, followed by b main (to set a breakpoint at the start of the main method)
followed by run. The app starts and then immediately stops at the start of the main
method as we requested.
As we work through this disassembly, press n and return to step through the code line by line as we perform our analysis of what the program does. The caret (►) will show which line is about to be executed when you next press n.
The UI can be a little overwhelming initially, I want to point out that the top pane contains the state of the CPU registers at the time the app hit the breakpoint, the second pane contains the disassembly, the third pane contains the stack and the bottom pane contains the call stack. All of this will be covered in additional detail soon.
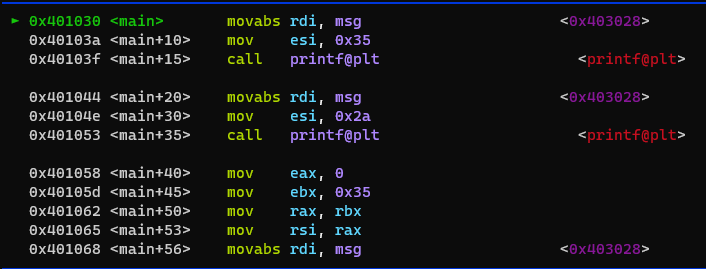
GDB is paused at the first instruction, movabs rdi, msg. We can introspect the contents of
msg by running telescope &msg 1 which will dereference the msg pointer and print the
text that it points to. Don't be alarmed that the instruction has changed from mov to
movabs, this is just a compiler optimization which happened automagically.
Pressing n will advance to the next instruction in the disassembly, observe that the RDI variable in
the registers pane at the top of the screen changes to an address like 0x403028 as a result of the
MOV operation. Step forward again with n to place 0x35 into RSI. The disassembly says ESI, but this
is just a compiler optimization because the source value is such a small value. ESI is analogous to RSI here, so
it's the same end result in this case.
Step forward again and observe that now that the call to printf is highlighted, GDB helpfully shows
you what the arguments to the function will be -

Continue to step through the code with n, pay close attention to the state of the registers after each
instruction in the program. Observe how after each call to printf, the RAX variable
changes to the number of characters which were printed, this is because functions store their return addresses
in the RAX register by convention!
Continue to step through the code until the call to exit is hit, then GDB should inform you that the
application has closed. It can be restarted again if you wish with run or r for short.
Closing thoughts
We covered a load of dry theory again this lesson, but we are rapidly approaching the point where we can reverse engineer some more challenging executables. Next lesson we'll cover the stack, which is fundamentally important for more complex ASM applications.