How to follow along
Two basic docker commands are required to follow along with this lesson -
docker pull learnreverseengineering/lesson3docker run -it --cap-add=SYS_PTRACE --security-opt seccomp=unconfined learnreverseengineering/lesson3 bash
Lesson intro and a warning
We're about to start learning about a fundamental concept of most assembly languages - the stack. In a high level language like C or Java we can, theoretically, create as many variables as we like in a function (hundreds of variables, even). Because ASM only has a finite number of general purpose registers (15 or so) we would quickly run out of space to store variables if we were constrained in this manner.
Also, there isn't really any guarantee that a register's value will stay the same before and after a function call, because any function can overwrite a register with whatever value they please. The stack is a general purpose storage location which can persist any kind of data across function calls and throughout program execution.
Using the stack, an application can declare as many variables as necessary in order to complete arbitrary tasks - it removes the limitations imposed by the finite list of registers.
The warning - this can be a confusing topic for a budding reverse engineer, genuinely. I'll do my best to make it as approachable as possible with clear examples and diagrams, but it's likely going to be a little confusing nonetheless. Just re-read the material until it makes sense or contact me on Mastodon/electronic mail and I'll do my best to explain things in a different way to get you through it.
What's a stack?
The stack is a basic and common data structure in computer science. It is essentially a "last in, first out" list
of data which can be added to by PUSHing data onto the top of the list, and can be removed from by
POPping data from the top of the list. In fact, (as the code tags allude to) this is exactly how
the operations are performed in ASM. Wikipedia has the following to say on
the matter:
[The stack is] Considered as a linear data structure, or more abstractly a sequential collection, the push and pop operations occur only at one end of the structure, referred to as the top of the stack. This data structure makes it possible to implement a stack as a singly linked list and as a pointer to the top element. A stack may be implemented to have a bounded capacity. If the stack is full and does not contain enough space to accept another element, the stack is in a state of stack overflow.
Readers with some exploit development/security experience will recognize the term 'stack overflow', this is where the term originates from!
An example then. Consider a stack of 5 plates which are covered in sandpaper, so you cannot simply slide one out at random.
| Plate 1 🍽 |
| Plate 2 🍽 |
| Plate 3 🍽 |
| Plate 4 🍽 |
| Plate 5 🍽 |
If you wanted to get to the middle one, you'd first need to POP one from the top -
| *pop* |
| Plate 2 🍽 |
| Plate 3 🍽 |
| Plate 4 🍽 |
| Plate 5 🍽 |
Then another -
| *pop* |
| *pop* |
| Plate 3 🍽 |
| Plate 4 🍽 |
| Plate 5 🍽 |
Then the third plate would be accessible. Then you'd replace the plates that were removed by PUSHing
them back onto the stack again.
How is the stack represented in Linux processes?
Some key points about applications and the stack -
- Every application has its own stack
- The stack isn't persisted when applications close
- The stack grows downwards from higher addresses in process memory (RAM) to lower addresses...
That last point is a mindbender, so here's a diagram of how a Linux process's memory is laid out to elucidate things:
| 0x7FFFFFFFFFFFFFFF |
| Kernel Memory (highest addresses in process memory) |
| ARGV, environment variables |
| The Stack |
| 🔻 |
| Unallocated Memory and shared library code |
| 🔺 |
| The Heap |
| .bss Section (Uninitialised Data) |
| .data Section (Initialised Data) |
| .text section (AKA your program code, lowest addresses in process memory) |
| 0x0000000000000000 |
Some of the data in the diagram above can be ignored, because it's a little less relevant to us whilst we're learning ASM. The key takeaway here should be that the stack starts in higher process memory and grows downwards into "unallocated memory", this lets the stack grow to be as big as it needs to be to accommodate data and variables.
A fun quirk of applications, if the stack grows large enough (downwards!) then it could theoretically collide with shared library code and crash the application. But in reality this never happens, unless you try to cram multiple gigabytes of data onto the stack intentionally.
You can see this memory layout in action in this lesson's Docker container by running watch cat &, observing the process ID which the terminal prints and then running cat /proc/THE_PROCESS_ID/maps | tac. The output will be as follows -
        root@795265d31d3e:/lesson# watch cat &
        [2] 20
        root@795265d31d3e:/lesson# cat /proc/20/maps | tac
        7fff721fa000-7fff721fb000 r-xp 00000000 00:00 0                          [vdso]
        7fff721f6000-7fff721fa000 r--p 00000000 00:00 0                          [vvar]
        7fff721d3000-7fff721f4000 rw-p 00000000 00:00 0                          [stack]
        7f21753c5000-7f21753c6000 rw-p 00000000 00:00 0
        7f21753c4000-7f21753c5000 rw-p 0002d000 08:20 1549                       /usr/lib/x86_64-linux-gnu/ld-2.31.so
        7f21753c3000-7f21753c4000 r--p 0002c000 08:20 1549                       /usr/lib/x86_64-linux-gnu/ld-2.31.so
        7f21753ba000-7f21753c2000 r--p 00024000 08:20 1549                       /usr/lib/x86_64-linux-gnu/ld-2.31.so
        7f2175397000-7f21753ba000 r-xp 00001000 08:20 1549                       /usr/lib/x86_64-linux-gnu/ld-2.31.so
        7f2175396000-7f2175397000 r--p 00000000 08:20 1549                       /usr/lib/x86_64-linux-gnu/ld-2.31.so
        7f217538f000-7f2175391000 rw-p 00000000 00:00 0
        7f217538e000-7f217538f000 rw-p 00038000 08:20 1627                       /usr/lib/x86_64-linux-gnu/libncursesw.so.6.2
        7f217538d000-7f217538e000 r--p 00037000 08:20 1627                       /usr/lib/x86_64-linux-gnu/libncursesw.so.6.2
        7f2175384000-7f217538d000 r--p 0002f000 08:20 1627                       /usr/lib/x86_64-linux-gnu/libncursesw.so.6.2
        7f217535d000-7f2175384000 r-xp 00008000 08:20 1627                       /usr/lib/x86_64-linux-gnu/libncursesw.so.6.2
        7f2175355000-7f217535d000 r--p 00000000 08:20 1627                       /usr/lib/x86_64-linux-gnu/libncursesw.so.6.2
        7f2175354000-7f2175355000 rw-p 0002e000 08:20 1691                       /usr/lib/x86_64-linux-gnu/libtinfo.so.6.2
        7f2175350000-7f2175354000 r--p 0002a000 08:20 1691                       /usr/lib/x86_64-linux-gnu/libtinfo.so.6.2
        7f2175342000-7f2175350000 r--p 0001d000 08:20 1691                       /usr/lib/x86_64-linux-gnu/libtinfo.so.6.2
        7f2175333000-7f2175342000 r-xp 0000e000 08:20 1691                       /usr/lib/x86_64-linux-gnu/libtinfo.so.6.2
        7f2175325000-7f2175333000 r--p 00000000 08:20 1691                       /usr/lib/x86_64-linux-gnu/libtinfo.so.6.2
        7f2175321000-7f2175325000 rw-p 00000000 00:00 0
        7f217531f000-7f2175321000 rw-p 001eb000 08:20 1571                       /usr/lib/x86_64-linux-gnu/libc-2.31.so
        7f217531b000-7f217531f000 r--p 001e7000 08:20 1571                       /usr/lib/x86_64-linux-gnu/libc-2.31.so
        7f21752cd000-7f217531b000 r--p 0019a000 08:20 1571                       /usr/lib/x86_64-linux-gnu/libc-2.31.so
        7f2175155000-7f21752cd000 r-xp 00022000 08:20 1571                       /usr/lib/x86_64-linux-gnu/libc-2.31.so
        7f2175133000-7f2175155000 r--p 00000000 08:20 1571                       /usr/lib/x86_64-linux-gnu/libc-2.31.so
        7f2175132000-7f2175133000 rw-p 00004000 08:20 1582                       /usr/lib/x86_64-linux-gnu/libdl-2.31.so
        7f2175131000-7f2175132000 r--p 00003000 08:20 1582                       /usr/lib/x86_64-linux-gnu/libdl-2.31.so
        7f2175130000-7f2175131000 r--p 00003000 08:20 1582                       /usr/lib/x86_64-linux-gnu/libdl-2.31.so
        7f217512e000-7f2175130000 r-xp 00001000 08:20 1582                       /usr/lib/x86_64-linux-gnu/libdl-2.31.so
        7f217512d000-7f217512e000 r--p 00000000 08:20 1582                       /usr/lib/x86_64-linux-gnu/libdl-2.31.so
        7f217512b000-7f217512d000 rw-p 00000000 00:00 0
        7f2174e45000-7f217512b000 r--p 00000000 08:20 3949                       /usr/lib/locale/locale-archive
        7f2174e3e000-7f2174e45000 r--s 00000000 08:20 1542                       /usr/lib/x86_64-linux-gnu/gconv/gconv-modules.cache
        559aecceb000-559aecdf4000 rw-p 00000000 00:00 0                          [heap]
        559aec1a5000-559aec1a6000 rw-p 00006000 08:20 1115                       /usr/bin/watch
        559aec1a4000-559aec1a5000 r--p 00005000 08:20 1115                       /usr/bin/watch
        559aec1a3000-559aec1a4000 r--p 00005000 08:20 1115                       /usr/bin/watch
        559aec1a0000-559aec1a3000 r-xp 00002000 08:20 1115                       /usr/bin/watch
        559aec19e000-559aec1a0000 r--p 00000000 08:20 1115                       /usr/bin/watch
We pipe the maps file to tac so that the output is inverted, which makes it match the
diagram I provided above. Observe that the stack can grow downwards towards lower memory, and it can grow from
0x7fff721f4000 to 0x7f21753c5000, which is 953430503424 bytes (around 1GB, plenty of space for a typical
application)
Interacting with the stack from ASM
We'll start our stack learnings by writing a small assembly application which puts some values into three registers, pushes them to the stack and then pops them back in reverse. The code can be found inside of the container at /lesson/pushAndPop.asm -
    section .text
        extern exit
        global _start, main

        main:
        _start:
            ; Firstly, setup some registers
            mov RDI, 0x01
            mov RSI, 0x02
            mov RAX, 0x03

            ; Secondly, push them to the stack
            push RDI
            push RSI
            push RAX

            ; At this point the top of the stack is 0x03

            ; Thirdly, pop the values off of the stack into the registers again
            pop RDI
            ; Top of the stack is now 0x02 and RDI contains 0x03
            pop RSI
            ; Top of the stack is now 0x01 and RSI contains 0x02
            pop RAX
            ; The stack is now back to whatever state it was in at the start of the main function

            mov RDI, 0 ; exit code will be '0'
            call exit ; quit the app
Inside of the container run GDB pushAndPopAsm, followed by b main followed by run, we'll be greeted by GDB pausing at the start of the main method. Take a look at the top of the stack at this point -
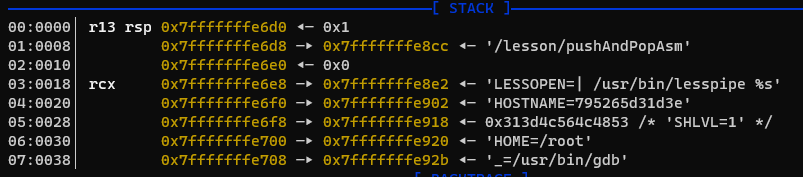
Observe that the top of the stack is currently 0x1, this is the equivalent to the argc variable
which you'd see at the start of any C program's main method, AKA the number of arguments (including the
application name) which were passed to the application. There are no arguments in this case, so
argc is 1.
Next on the stack is a string pointer which points to /lesson/pushAndPopAsm, followed underneath by 0x0.
Astute readers have probably already inferred that this corresponds with the argv 'argument vector'
which we see in every C application's main method. The '0x0' indicates the end of the argument vector has been
reached. We can prove this by running run test1 test2 test3 and observing that the stack now contains
those values after the program name (and the 'argc' value is now 0x4 as expected)

Start stepping through the code with n, observe that the relevant register values change to 0x01, 0x02 and 0x03. Step through each of the push instructions and observe that those values are placed onto the stack -
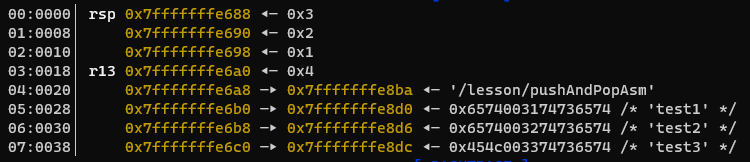
Notice that the RSP register was 0x7fffffffe6a0 at the start of the program, but is now 0x7fffffffe688. The RSP
register is the 'stack pointer' and points to the current top of the stack. We can see that by
PUSHing three values onto the stack we have caused it to grow downwards by 0x18 bytes (24 decimal),
this is expected in 64 bit processes because each integer which was pushed to the stack occupies 8 bytes each.
Three values pushed == 3 * 8 == 24 bytes.
Start stepping the disassembly again and observe that with every POP instruction the stack pointer register value increases, because the top of the stack is at a higher address with each POP. Also observe that each POP instruction takes a value off of the top of the stack and places it into the respective register. (RDI, RSI and RAX)
Manipulating the stack without PUSH and POP
So above I mentioned that the only way to access the middle plate in the stack of plates was to POP a couple of plates off of the stack to reach that one. That was only partially true when it comes to ASM.
It's true that you can only insert and remove values from the stack by PUSHing and POPping values, but it's also possible to replace values on the stack by using what we call 'stack offsets' (and stack frame offsets, which are discussed next lesson).
Manipulating the stack with stack offsets
In GDB, enter run again and then step through the code until three values have been PUSHed onto the stack.
RSP is the register which points to the address of the current top of the stack. If we dump the quadword that RSP currently points to with dq $rsp 1 we see the number 0000000000000003, we can also dump the quadword above that with dq $rsp+8 1 and the one above that with dq $rsp+16 1. These operations can also be performed using ASM too (and frequently are..), both to read values and change values.
The following code can be found in the Docker container under /lesson/stackManipulation.asm -
        section .text
        extern exit
        global _start, main

        main:
        _start:
            ; Firstly, setup some registers
            mov RDI, 0x01
            mov RSI, 0x02
            mov RAX, 0x03

            ; Secondly, push them to the stack
            push RDI
            push RSI
            push RAX

            ; At this point the top of the stack is 0x03

            ; Thirdly, overwrite the top of the stack with RDI
            mov qword [RSP], RDI
            ; Overwrite the second item down on the stack with RSI
            mov qword [RSP+8], RSI
            ; Overwrite the third item down on the stack with RAX
            mov qword [RSP+16], RAX

            ; Fourthly..? Read arbitrary stack values into registers
            mov RAX, qword [RSP]
            mov RSI, qword [RSP+8]
            mov RDI, qword [RSP+16]

            mov RDI, 0 ; exit code will be '0'
            call exit ; quit the app
Some of the above is new syntax for us. mov qword [RSP], RDI is a very common operation, it allows
applications to change values on the stack without needing to PUSH or POP anything. The instruction simply means
copy the data from RDI to the quadword pointer within RSP. the other, similar instructions which
use RSP+8 and RSP+16 simply reference the values directly underneath the top of the
stack.
Conversely and accordingly, the mov RAX, qword [RSP] instruction is also very common, and it allows
applications to read arbitrary values on the stack without needing to POP them off first (this is like a peek
operation, for CS folks who are reading this). The instruction simply means
copy the data from the top of the stack into RAX. The instructions which use RSP+8 and
RSP+16 are, again, referencing the data just below the top of the stack.
Step through this application ( /lesson/stackManipulationAsm ) with GDB to watch the application firstly changing the values on top of the stack and then changing the register values by reading data off of the stack.
When you disassemble these applications with GDB you'll see that the disassembly says "qword ptr" rather than "qword". This is expected, the NASM compiler won't accept the ptr keyword, it's just implied by the presence of the word qword and the square brackets.
Independent study task
We learned a lot in this lesson about process internals and how applications use the stack. At this point we know enough to write a small program in ASM which puts some data onto the stack (using PUSH) and then manipulates it.
The task then, is to use the mov dword ptr, mov word ptr and mov byte btr
instructions to set individual dwords (4 bytes), words (2 bytes) and bytes (1 bytes) in stack addresses to
modify the contents of the stack with more granularity. You have a wealth of sample material above to draw from,
and I'm confident that you'll be able to accomplish this.
Compile your code with nasm -felf64 -o temp -l temp.lst WHATEVER_YOU_NAMED_YOUR_CODE.asm and link it with ld temp -o WHATEVER_YOU_WANT_TO_CALL_THE_EXECUTABLE -lc --dynamic-linker /lib64/ld-linux-x86-64.so.2